参考资料
在安装和调整的过程中参考了很多大佬的经验帖,本想一一逐点引用,但考虑到完整不被中断的阅读体验(我就很喜欢遇到链接直接点然后开了十几个标签页找不到原来在看的文章了),同时篇幅太长可能会有不存在的读者忽略掉底部的参考列表,在此统一把我阅读参考过的文章放在最前面。互联网有你们了不起:D
安装
安装Hexo
安装Hexo CLI
npm install -g hexo-cli在项目根目录中初始化一个新的 Hexo 项目,这将生成必要的文件和目录结构
hexo init安装Stellar模板
npm i hexo-theme-stellar在 blog/_config.yml 文件中找到并修改:
theme: stellar生成静态文件并运行本地服务器以查看新主题
hexo g
hexo s
自定义博客样式
调整模板位置方便后续维护和更新
把blog/node_modules/hexo-theme-stellar文件夹复制到blog/themes文件夹里,修改命名为stellar;
把blog/themes/stellar里的_config.yml剪切到blog里,修改名字为_config.stellar.yml
布局修改
尺寸修改
- 侧边栏宽度加宽:
--side-content-width: 220px - 文章宽度加宽:
--width-main: 800px - 侧边栏title和subtitle间隔修改
// 自定义侧边栏标题和副标题的间隔
.title .main
  margin-bottom: 6px
颜色修改
- 颜色选择可参考
配色方案
style:
  ...
  color:
    # 动态颜色(会根据明暗主题重设明度值,只用关心色相和饱和度即可)
    background: 'hsl(212 16% 98%)' # 背景颜色
    block: 'hsl(212 8% 95%)' # 块背景颜色
    code: 'hsl(14 100% 48%)' # 行内代码颜色
    text: 'hsl(0 0% 20%)' # 文本颜色

    # 主题色配置(不会根据明暗动态调整,请设置为通用的颜色)
    theme: 'hsl(180 20% 50%)' # 主题色
    accent: 'hsl(330 50% 57%)' # 强调色
    link: 'hsl(180 20% 50%)' # 超链接颜色
hover: 'hsl(330 50% 57%)' # 按钮高亮颜色侧边栏颜色修改
- 注释
background-image: url(https://gcore.jsdelivr.net/gh/cdn-x/placeholder@1.0.13/image/sidebar-bg1@small.jpg) - 添加
background: 'hsl(180, 20%, 87%)' - menubar中同步修改
theme: '#5C8A8A'
工具提示样式修改
// 悬停时提示文本框样式修改
.nav-item
  position: relative
  &:hover::after,
  &.active:hover::after
    content: attr(title) !important
    position: absolute !important
    top: 100% !important
    left: 50% !important
    transform: translateX(-50%) !important
    background-color: var(--theme-link-opa) !important
    color: var(--theme-text-color) !important
    padding: 5px !important
    border-radius: 5px !important
    z-index: 1 !important
    white-space: nowrap !important
    box-sizing: border-box !important
    text-align: center !important
    display: block !important
    width: 100% !important
    min-width: 60px !important  // Set a minimum width for consistency
    min-height: 30px !important // Set a minimum height for consistency
    height: auto !important
    line-height: 20px !important // Adjust line-height for centered text
    padding-top: 5px !important
    padding-bottom: 5px !important
    display: flex !important
    align-items: center !important
    justify-content: center !important

  &.active:after
    content: ''
    position: absolute
    width: 16px
    height: 2px
    left: 50%
    transform: translateX(-50%)
    border-radius: 2px
    bottom: 2px
    background: currentColor
codecopy颜色修改
// 自定义代码块复制按钮样式
.highlight .code .copy-btn.success
  background: #5C8A8A !important // 更改成功后的背景色
  color: white !important // 设置文本颜色为白色
codecopy禁止弹出“复制成功”字样
- 修改位置:
blog/themes/stellar/source/js/plugins/copycode.js - 注释掉
hud.toast(ctx.copycode.toast, 2500);即可
选中文本颜色修改
// 选中文本:使用超链接高亮的背景色
::selection {
  background: var(--theme-link-opa);
}
字体修改
inject:
  head:
    - <link href="https://fonts.googleapis.com/css2?family=Noto+Serif+SC&display=swap" rel="stylesheet">
    - <link href="https://fonts.googleapis.com/css2?family=Noto+Sans:ital,wght@0,100..900;1,100..900&display=swap" rel="stylesheet">
    - <link href="https://fonts.googleapis.com/css2?family=Noto+Sans+SC:wght@100..900&display=swap" rel="stylesheet">
    - <link href="https://fonts.cdnfonts.com/css/google-sans" rel="stylesheet">
...
style:
  ...
  font-size:
    root: 16px # 改这个会影响全局所有文字的字号
    body: .9375rem # 影响正文区域的字号,如果改成 px 则不受 root 影响
    code: 85% # 相较于其所在行的文本大小,建议用百分比
    codeblock: 0.8125rem # 13px
  font-family:
    logo: '"Product Sans", "Noto Sans SC", "Noto Sans", system-ui, "Microsoft Yahei", "Segoe UI", -apple-system, Roboto, Ubuntu, "Helvetica Neue", Arial, "WenQuanYi Micro Hei", sans-serif'
    body: '"Noto Sans SC", "Product Sans", "Noto Sans", system-ui, "Microsoft Yahei", "Segoe UI", -apple-system, Roboto, Ubuntu, "Helvetica Neue", Arial, "WenQuanYi Micro Hei", sans-serif'
    code: 'Menlo, Monaco, Consolas, system-ui, "Courier New", monospace, sans-serif'
    codeblock: 'Menlo, Monaco, Consolas, system-ui, "Courier New", monospace, sans-serif'
侧边栏修改
左侧边栏图标修改
在图标库里找到想要替换的图标,复制svg后粘贴到到blog/themes/stellar/_data/icons.yml文件中;然后在_config.stellar.yml中直接引用icon名称即可
最近更新文章显示更新日期
- 在
recent.ejs中添加一行代码
...
arr.forEach(post => {
	...
	el += post.title + '</span>';
	// 添加更新时间显示
	el += `<span class="post-date">${date(post.updated, 'YYYY-MM-DD')}</span>`;
	el += '</a>';
    el += '';
  });
...- 调整日期样式
// 调整侧边栏最近更新日期样式
.widget-wrapper.post-list .widget-body {
  .item.title {
    display: flex;
    justify-content: space-between;
    align-items: center;

    .title {
      flex-grow: 1;
    }

    .post-date {
      font-size: 0.75em; // 使日期字体比标题小
      font-weight: bold; // 加粗日期
      color: #888; // 设置一个稍浅的颜色
      margin-left: 10px; // 在标题和日期之间添加一些间距
      white-space: nowrap; // 防止日期换行
    }
  }
}
最近更新中显示选中状态
如果文章是属于某个专栏的话,点击文章跳转后会看到侧边栏的专栏中该文章题目底色变浅,而且有个小小的书签提示是选中状态;
但点击不属于专栏的、“最近更新”中的文章跳转后,侧边栏没有任何变化。
感觉这好像不太符合用户(此处用户指我自己)的习惯,所以想要让这些文章在被选中后底色也有所改变。
...
  arr.forEach(post => {
    if (!post) { return }
    // 添加 isActive 判断
    const isActive = post.path == page.path
    el += `<a class="item title${isActive ? ' active' : ''}" href="${url_for(post.link || post.path)}">`
    el += '<span class="title">'
  ...
左侧边栏增加分类显示
感觉没有一个分类入口略显寡淡哈,所以做了如下设置。
- 增加分类widgets文件
sidebar_categories.ejs
<% if (site.categories.length) { %>
    <widget class="widget-wrapper post-list">
      <div class="widget-header dis-select">
        <span class="name">分类</span>
      </div>
      <div class="widget-body fs14">
        <% site.categories.sort('name').each(function(category){ %>
          <% const isActive = page.category === category.name; %>
          <a class="item title<%= isActive ? ' active' : '' %>" href="<%= url_for(category.path) %>">
            <span class="title"><%- category.name %></span>
            <span class="post-date">(<%- category.posts.length %>)</span>
          </a>
        <% }) %>
      </div>
    </widget>
<% } %>- 在widgets文件中添加侧边栏分类样式
...
categories:
  layout: sidebar_categories
limit: 6 # 可选:限制显示的分类数量- 修改主题文件,添加分类入口
...
######## Main ########
# 站点主结构树
site_tree:
  # -- 列表类页面 -- #
  # 主页配置
  home:
    leftbar: welcome, categories, recent
    rightbar:
  # 博客列表页配置
  index_blog:
    base_dir: blog # 只影响自动生成的页面路径
    menu_id: post # 未在 front-matter 中指定 menu_id 时,layout 为 post 的页面默认使用这里配置的 menu_id
    leftbar: welcome, categories, recent # for categories/tags/archives
...
文章左侧边栏增加分类下所有文章
当一个博文有topic属性时,侧边栏会显示该专栏的文章。我觉得这个挺好的,所以想设置如果一篇博文有categories属性的话,侧边栏也能显示该分类下的文章。
- 增加相关分类widgets文件`cat_related.ejs
<%

function recentPostsInCategory() {
  // 如果文章同时具有topic属性,则不显示分类下相关文章了
  if (page.topic?.length > 0) {
    return ''
  }
  if (!page.categories || page.categories.length == 0) {
    return '';
  }

  const category = page.categories.data[0];
  if (category == null) {
    return '';
  }

  var el = '';
  el += `<widget class="widget-wrapper${scrollreveal(' ')} post-list">`;
  el += `<div class="widget-header dis-select">`;
  el += `<span class="name">${category.name} 最近文章</span>`;
  el += `</div>`;
  el += `<div class="widget-body">`;

  // 获取该分类下的文章,按日期排序,并限制数量

  const posts = category.posts.sort('date', -1).limit(10);
  posts.forEach(function(post) {
    const isActive = post.path == page.path;
    el += `<a class="item${isActive ? ' active' : ''}" href="${url_for(post.path)}">`;
    el += `<span class="title">${post.title}</span>`;
    // 添加发布时间显示
    el += `<span class="post-date">${date(post.date, 'MM-DD')}</span>`;
    el += `</a>`;
  });

  el += `</div>`;
  el += `</widget>`;
  return el;

}


function layoutDiv() {
  if (page.categories && page.categories.length > 0) {
    return recentPostsInCategory();
  } else if (page.topic && page.topic.length > 0) {
    return relatedPostsInTopic();
  } else if (page.wiki && page.wiki.length > 0) {
    return relatedWiki();
  }
}

%>

<%- layoutDiv() %>- 在widgets文件中添加侧边栏分类相关样式
...
cat_related:
layout: cat_related- 修改主题文件
...
  # 博客文章内页配置
  post:
    menu_id: post # 未在 front-matter 中指定 menu_id 时,layout 为 post 的页面默认使用这里配置的 menu_id
    leftbar: cat_related, related, recent # for pages using 'layout:post'
    rightbar: ghrepo, toc
...
右侧边栏增加静态时间线
侧边栏增加动态时间线的教程很详细,创建静态时间线的教程也简单明了,但是究竟怎么在侧边栏增加静态时间线呢……琢磨了很久,找到了一个丑陋的实现办法T_T,先用着吧还是。
- 修改
timeline.ejs,使其能读取静态文件
<% function layoutDiv() {
  try {
    var el = '';
    el += `<widget class="widget-wrapper timeline">`;
    if (item.title) {
      el += '<div class="widget-header dis-select">';
      el += '<span class="name">' + item.title + '</span>';
      el += '</div>';
    }

    el += '<div class="widget-body fs14">';
    el += `<div class="tag-plugin timeline ds-timeline">`;

    // 读取静态数据并构建 timeline
    if (item.data_file && site.data[item.data_file]) {
      const updates = site.data[item.data_file].content;
      updates.forEach(update => {
        el += `<div class="timenode">`;
        el += `<div class="header"><span>${update.date}</span></div>`;
        el += `<div class="body"><p>${update.content}</p></div>`;
        el += `</div>`;
      });

    } else {
      el += '未指定数据源或数据不存在';
    }

    el += '</div>';
    el += '</div>';
    el += '</widget>';
    return el;

  } catch (error) {
    console.error('Error in timeline.ejs:', error);
    return `<div>Error rendering timeline: ${error.message}</div>`;
  }

} %>
<%- layoutDiv() %>
- 添加对应的widgets
...
site_updates:
  layout: timeline
  title: 站点更新
data_file: site_updates- 修改主题配置文件
...
site_tree:
  # -- 列表类页面 -- #
  # 主页配置
  home:
    leftbar: welcome, categories, recent
rightbar: site_updates- 创建站点更新的静态文件
content:
  - date: '2024-08-12 22:41'
    content: '新增主页右侧边栏站点更新时间线功能'
目录一级标题加粗
// 一级目录加粗
.widget-wrapper.toc .toc > .toc-item > .toc-link {
  font-weight: bold;
}
取消“参与讨论”按钮入口
好像没找到相关的修改经验QAQ但本人是极度社恐兼讨好型人格,思来想去要是设置评论区只会让自己忧愁“为什么没人评论”和“我要怎么回复评论才不会冒犯到别人”,因此想要干脆取消“参与讨论”这个于我没用的按钮!
// 隐藏"参与讨论"按钮
.widget-wrapper .widget-footer .buttom {
  display: none !important;
}
文章样式修改
显示更新时间
// 文章内更新日期始终显示
.bread-nav div#post-meta span.updated {
    visibility: visible !important;
}
调整post_card的日期和分类位置
这里修改了很久QAQ,还是我的审美不太行,调整了N次位置后决定:1)把日期移到标题上方;2)把分类移到右上角,和日期同一行。
- 修改
post_card.ejs,在div_default函数中移动time和cat的代码,把它们放在标题前面
...
function div_default() {
  ...
  // 封面
  ...
  // meta
  el += '<div class="meta cap date-category-wrapper">';
  // time
  el += '<span class="cap" id="post-meta">';
  el += `<time datetime="${date_xml(post.date)}">${date(post.date, config.date_format)}</time>`
  el += '</span>';
  // cat
  if (post.layout === 'post' && post.categories && post.categories.length > 0) {
    el += '<div class="post-category">';
    var cats = [];
    if (post.categories) {
      post.categories.forEach((cat, i) => {
        cats.push(cat.name);
      });
    }
    if (cats.length > 0) {
      let cat = cats.shift();
      el += '<span class="cap breadcrumb"' + category_color(cat) + '>';
      el += icon('default:category')
      el += `<span>${cat}</span>`
      el += '</span>';
    }
    el += '</div>';
  }
  el += '</div>'; // 关闭 meta cap
  // 标题
  ...
  // 摘要
  ...
  // 置顶标记
  ...
}
...- 完成上一步后预览效果会发现日期和分类都到标题上了,但是两者挨得很近,所以还需要修改CSS样式
// 设置post_card上分类和日期位置
.date-category-wrapper {
  display: flex;
  justify-content: space-between;
  align-items: center;
  margin-bottom: 10px; /* 调整与标题的间距 */
}

#post-meta {
  flex-grow: 1;
}

.post-category {
  flex-shrink: 0;
  margin-left: 15px;
}
增加标签显示
- 在post_card上增加标签显示
...
function div_default() {
  ...
  // 置顶标记
  el += '<div class="meta cap post-card-meta">';
  if (post.sticky) {
    el += `<span class="pin">${icon('default:pin')}</span>`
  }
  el += '</div>';

  // tags
  if (post.layout === 'post' && post.tags && post.tags.length > 0) {
    el += '<div class="meta cap tags-line">';
    var tags = [];
    post.tags.forEach((tag, i) => {
      tags.push(tag.name);
    });
    if (tags.length > 0) {
      tags.forEach(tag => {
        el += `<span class="cap tag">${tag}</span>`;
      });
    }
    el += '</div>';
  }
  el += '</article>';
  return el;
}
...- 修改对应CSS样式
// 设置标签格式
.cap.tag {
  display: inline-block;
  background-color: var(--theme-link-opa);
  color: #5C8A8A;
  line-height: 1.2;
  border-radius: 4px;
  font-size: 0.8em;
  padding: 4px 8px;
  margin-right: -12px;
}- 在文章的banner上增加标签显示
...
function layoutBottom() {
	...
}

// 新增tags函数
function layoutTags() {
  if (page.layout == "post" && page.tags && page.tags.length > 0) {
    return `
    <div class="article-tags">
      ${page.tags.map(tag => `<a class="cap tag" href="${url_for(tag.path)}">#${tag.name}</a>`).join(' ')}
    </div>
    `;
  }
  return '';
}

function layoutDiv() {
	...
	const top = layoutBreadcrumb()
	const tags = layoutTags()  // 新增
	...
	<div class="content"${style}>
    ${tags}  <!-- 新增 -->
    ${top}
    ...
}
...- 修改对应CSS样式
// 设置文章banner上标签格式
.article.banner
  position: relative

  .article-tags
    position: absolute
    top: 10px
    right: 10px
    z-index: 1

    .cap.tag
      display: inline-block
      color: #5C8A8A
      line-height: 1.2
      border-radius: 4px
      font-size: 0.8em
      padding: 4px 8px
      margin-right: -6px
      text-decoration: none
      transition: color 0.3s

      &:hover
        color: darken(#5C8A8A, 20%)

      // 移除背景色
      background-color: transparent

      // 在悬停时添加下划线
      &:hover
        text-decoration: underline

// 移除最后一个标签的右边距
.article.banner .article-tags .cap.tag:last-child
  margin-right: 0
wiki内文章显示发布日期
还没找到办法……一定会找到的!
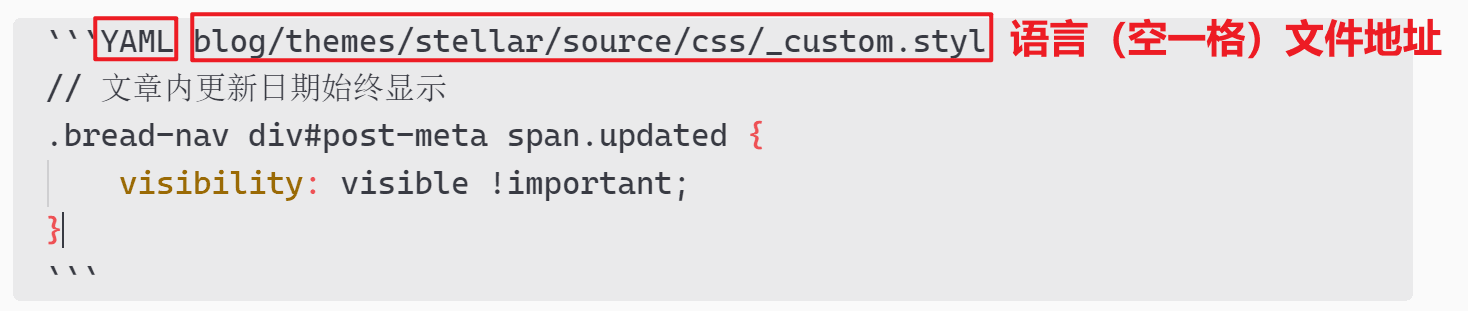
代码显示文件地址和语言
折腾了半天发现其实这个纯纯就是语法上的设置,本来都不太想写了,但又想还是给以后的自己记录下提个醒吧!
统计
站点统计
Stellar官方文档采用的是不蒜子进行站点统计,研究了一番决定也是采用相同的插件啦,毕竟它看起来操作比较简单,again,符合我的智力水平。
我的需求是显示总访问量PV和访客量UV,这两个都非常简单,直接在前述的不蒜子文档里可以找到相关的脚本。
footer:
	...
	content: |
	...
	</br>
    <script async src="//busuanzi.ibruce.info/busuanzi/2.3/busuanzi.pure.mini.js"></script>
    <span>

      <i class="fas fa-eye"></i>  <span id="busuanzi_value_site_pv"></span> | <i class="fas fa-user"></i>  <span id="busuanzi_value_site_uv"></span>

    </span>